Raising pivot 16%(0.25in), 28%(0.5in), 38%(0.75in), 45%(1.00in)

Shortening the shifter height:
The shifter is machined at the top of the shaft so the easiest method is to cut from the bottom. To cut from the bottom the pivot ball and shifter ball have to be raised an equivalent distance that the shifter is shortened. So say you want to shorten the shaft a 1/2 inch, the shifter ball and pivot ball have to be raised a 1/2 inch (the pivot ball will be raised farther if desiring to shorten the throw even more). The first thing to do is figure out how much you want to lower the shifter (based on % throw reduction or preference).
Remove the shifter from the gear lever housing. Now disassemble the shifter all the way down to the shaft. The reverse pin is removed by turning it counterclockwise and the shift knob just needs a big tug.
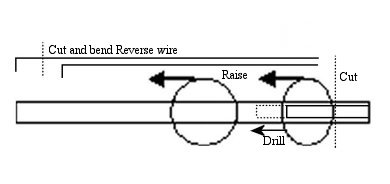
Stick the proper drill bit in the bottom of the shaft and mark how deep the reverse pin bore is. Measure up the drill bit the additional distance you want to shorten the shaft and wrap around a piece of tape. Then drill the pin bore the additional distance. Now cut the distance you're lowering off the end of the shaft. Now take the reverse wire and flatten the L bend on the top. Measure the distance that you are shortening the shaft and cut from the top of the wire. Create a new L bend at the top of the wire.
The next step is to raise the pivot and shifter ball. For the Pre-90, identify location pin hole for the shifter/pivot ball assembly and measure up the distance you are shortening the shifter and drill a new hole. To shorten the throw additionally by raising the pivot ball, the pre-90 needs the pivot half of the pivot/shifter ball assembly separated in two and the pivot half drilled for a second pin. Then a second hole is drilled in the shaft to raise the pivot ball. For the 91-post, identify location pin hole for the shifter ball and measure up the distance you are shortening the shifter and drill a new hole. Then the metal pivot ball needs raised that same distance by cutting the welds and then re-welding higher. If shortening the throw additionally by raising the pivot point, you need to add the height your raising the pivot point w/ the height you shortened the shifter and then raise the metal shifter ball that distance.
Raising the Pivot Point:

Pre-90 shifter assemblies
Parts required:
0.5" or 0.75" thick spacer (3"ODx2"ID Aluminum Tube)
0.5" or 0.75" thick spacer (2"OD, 3/8-1/2" thick wall Aluminum Tube)
(3) 5mm- 0.8 x 35-40mm machine bolts (Home Depot)
Graphite Grease or your favorite shifting grease
Procedure:
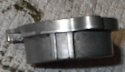
Making
the spacers: you have lots of options; find a 2.75"x2.75" square piece of
aluminum and use a hole saw or have it machined w/ a 2" hole, find a 3" OD
aluminum tube w/ a 2" ID, and for the smaller just find a 2" aluminum tube w/ a
3/8-1/2" wall (NOTE: THE RED SPACER IN THE PICTURE HAS TOO THICK OF
A WALL, MAKE NOTE OF SIZE MENTIONED). You have to make sure the spacers are of equal thickness and
properly squared off. If you need spacers, I probably can get some made up. I
bought two 9" long pieces of both tubes described. The bottom plastic seat
of the pivot assembly has a plastic guide that prevents the shifter from
rotation and holds the cup in place, it will require a square section be cut or
grinded on the inside wall of the 2"ID spacer.
For the 0.75" spacer, a better design would be a riser cup(2"IDx3"ODx0.75" top w/ a 2"ODx1.2"ID bottom, one piece). But that would need to be machined.
If the shifter isn't disassembled yet from shortening, then completely disassemble (knob/handle, reverse wire, reverse handle, boot, and pivot/shifter ball assembly) and clean the parts. Examine all the plastic parts for wear and replace as necessary.
 Next is to cut the
pivot/shifter ball assembly into two parts. Use a saw w/ a very think blade so
less material is loss (band saw etc.). The idea is to keep the shifter ball
where it is at on the shifter shaft and raise the pivot ball higher. I would
suggest cutting above the placement pin hole and using that to place the shifter
ball, then drilling a new hole on the pivot half for a second placement pin
(find a pin that isn't too big and obtrusive, but will hold the assembly in
position). The picture to the right is from a 91-post (I'm trying to use the
pics I've got), the idea should be the same. The lower half will be separate
from the top.
Next is to cut the
pivot/shifter ball assembly into two parts. Use a saw w/ a very think blade so
less material is loss (band saw etc.). The idea is to keep the shifter ball
where it is at on the shifter shaft and raise the pivot ball higher. I would
suggest cutting above the placement pin hole and using that to place the shifter
ball, then drilling a new hole on the pivot half for a second placement pin
(find a pin that isn't too big and obtrusive, but will hold the assembly in
position). The picture to the right is from a 91-post (I'm trying to use the
pics I've got), the idea should be the same. The lower half will be separate
from the top.
W/ the shifter ball lined up on the shaft, measure up the shaft how far you are shortening the throw (0.5" or 0.75") and scribe a line. Remove the shifter ball and line up the bottom of the pivot ball half to the scribed line (make sure the ball is in the proper position so that the anti-rotational pin is in the correct position). Through the hole you drilled for the new placement pin, scribe a mark on the shaft. Pull the pivot ball off and drill the proper diameter hole through the shaft (make sure it's squared!). Now you just reassemble the shaft and lube it up.
Place the 2" spacer in the cup and the 3" spacer on top, then set the modified shifter into the spacers. Using the new bolts listed above and some red loctite, bolt on your new short throw shifter.
91-93/94c Shifter assemblies
Parts required:
0.5" or 0.75" thick spacer (3"ODx2"ID Aluminum Tube)
0.5" or 0.75" thick spacer (2"OD, 3/8-1/2" thick wall Aluminum Tube)
(3) 5mm- 0.8 x 35-40mm machine bolts (Home Depot)
Graphite Grease or your favorite shifting grease
Procedure:
 Making the spacers is
just the same as above, but if you're only raising the pivot point a 0.5" on the
later shifter assembly, the smaller spacer isn't really required, a
3"ODx2"IDx0.5" aluminum will work.
Making the spacers is
just the same as above, but if you're only raising the pivot point a 0.5" on the
later shifter assembly, the smaller spacer isn't really required, a
3"ODx2"IDx0.5" aluminum will work.
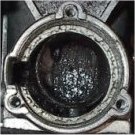
 Also, the later shifter
uses a metal housing to contain the pivot assembly. The metal housing has two
guides which position the shifter into the assembly. The guides aren't necessary
if you line the bolt holes properly and the bolts keep if from rotating. So you
can either grind/cut the proper guide paths in the 2"ID spacer or you can grind
the guides off the metal housing.
Also, the later shifter
uses a metal housing to contain the pivot assembly. The metal housing has two
guides which position the shifter into the assembly. The guides aren't necessary
if you line the bolt holes properly and the bolts keep if from rotating. So you
can either grind/cut the proper guide paths in the 2"ID spacer or you can grind
the guides off the metal housing.
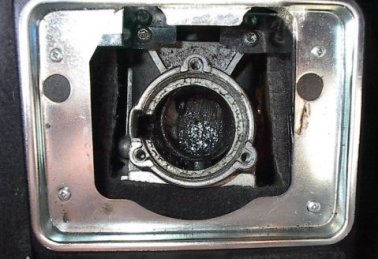
 The
91-93/94c shifter has a pivot assemble designed w/ a casted
metal housing and a plastic insert compared to the post-90 which has a separate
plastic pivot seat and a metal retainer. The idea of this mod is to raise the
pivot ball by using an aluminum spacer to raise the 91-93/94c pivot assembly
housing above the normal seat. The normal seat is only 1/2 inch deep
The
91-93/94c shifter has a pivot assemble designed w/ a casted
metal housing and a plastic insert compared to the post-90 which has a separate
plastic pivot seat and a metal retainer. The idea of this mod is to raise the
pivot ball by using an aluminum spacer to raise the 91-93/94c pivot assembly
housing above the normal seat. The normal seat is only 1/2 inch deep
 I'm not exactly sure if
every shifter is made alike and if the pivot ball height is different for every
car. So if you picked up assembly from another car, I would, as a precaution, remove
your existing shifter assembly and measure the
distance from shifting ball center to pivot ball center and compare to 91-93/94c
shifter. Try installing the newer shifter in your car to verify the distance
will work properly. If different then keep in mind to properly adjust.
I'm not exactly sure if
every shifter is made alike and if the pivot ball height is different for every
car. So if you picked up assembly from another car, I would, as a precaution, remove
your existing shifter assembly and measure the
distance from shifting ball center to pivot ball center and compare to 91-93/94c
shifter. Try installing the newer shifter in your car to verify the distance
will work properly. If different then keep in mind to properly adjust.
Mark the location of the metal pivot ball by scribing a line on the shifter shaft right under the pivot ball. Also, identify the position of the ball w/ its location pin and the position of the shifter shaft (scribe a line of some sort). Then, using a dremel or die grinder w/ a small cutting wheel, cut off the two tack welds on top of the metal ball keep it in place. BE SURE NOT TO CUT THE SHIFTER SHAFT. Knock the pivot ball down the shaft or place shifter upside down in vise w/ ball resting on top of a vise and knock the shaft out of the ball. Inspect the shaft for any bending, commonly at the point above the metal pivot ball, straighten as needed (you could use a rubber hammer on a strong, straight surface).
Measure up from the scribe line how far you want to raise the pivot point (0.5" or 0.75") and scribe a new line. Place pivot ball on shaft above the new scribed line and rotate the ball in the right orientation so the location pin is in the proper position. Using an arc welder place two tacs on top of the ball to the shaft and grind any protrusive welds back.
Assemble the pivot assembly using appropiate grease, then place the (2) spacers (or 1 if you're only raising it 0.5") onto/into the gear lever housing. Set the shifter in like normally but inside the spacers and bolt it on using red loctite w/ the suggested hardware above.
I'll have to admit, now that I've shortened my shifter, I'll never go back. I raised the pivot point by 0.75", didn't shorten the height at all, and I really like it. At first the throw felt really short, but now it feels so perfect and gear transitions are so much faster (no searching).
Here's a pic of one of my first spacer, I find a 2.5"ODx0.75" thick aluminum circular block at the scrap yard and used a 1.9" hole saw to cut the middle. There wasn't enough meat to drill the three holes, so I grinded channels out for the bolts. Then the only bolts I could find were 30mm in length, which were a little short. MAKE SURE YOU HAVE LONG ENOUGH BOLTS. Yeah, it was in prototype staging...
